How to Configure Email Settings on Outlook
| Questions |
Setup Email - Outlook Express
Setup Email - Microsoft Outlook
Change Spam Settings
Change SMTP Port - Outlook Express
Change SMTP Port - Outlook
| Setup Email - Outlook Express | top |
| 1. |
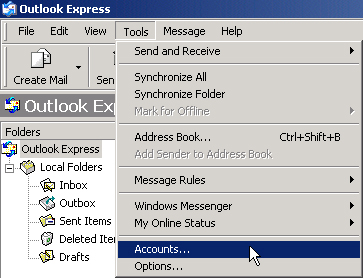
Please note: In the following diagrams, do NOT change / click anything else. ONLY change the areas indicated in RED. In particular, do not change your servers to "mail.maknet.com"; that is only provided as an example! After you launch Outlook Express, click on the Tools menu located at the top of the email program and select Accounts.
|
 |
|
| 2. |
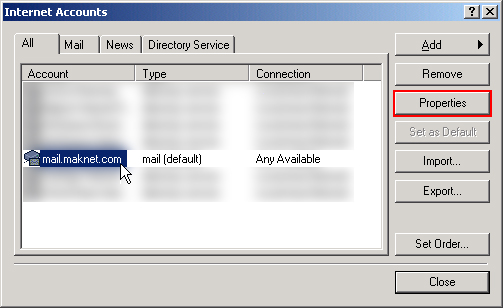
At the Internet Accounts window, select your email account and click Properties. Your email account will typically contain your website or domain name.
|
 |
|
| 3. |
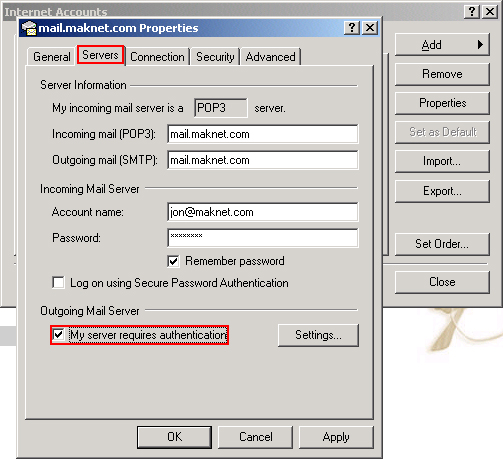
At the Properties window, click the Servers tab and make sure that "My server requires authentication" is checked.
|
 |
|
| 4. |
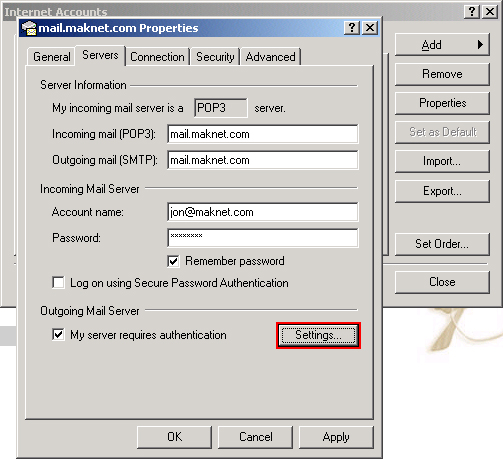
Click the Settings button.
|
 |
|
| 5. |
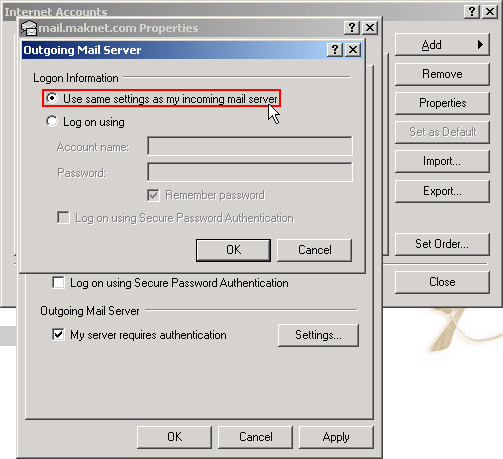
At the Outgoing Mail Server window, ensure that the "Use same settings as my incoming mail server" option is selected.
|
 |
|
| 6. |
Click OK to close the Outgoing Mail Server window. Click Apply then OK to close the email Properties window. Click Close to close the Internet Accounts window. |
 |
|
|
Your configuration should now be updated. If you have any questions or need any further assistance, please don't hesitate to Contact Us. |
|
| Setup Email - Microsoft Outlook | top |
| 1. |
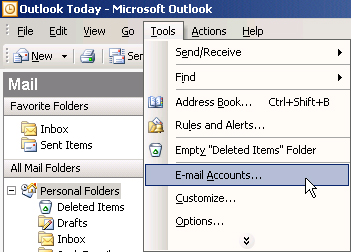
Please note: In the following diagrams, do NOT change / click anything else asides from the areas indicated in RED. In particular, do not change your servers to "mail.maknet.com"; that is only provided as an example! After you launch Microsoft Outlook, click on the Tools menu located at the top of the email program and select E-mail Accounts.
|
 |
|
| 2. |
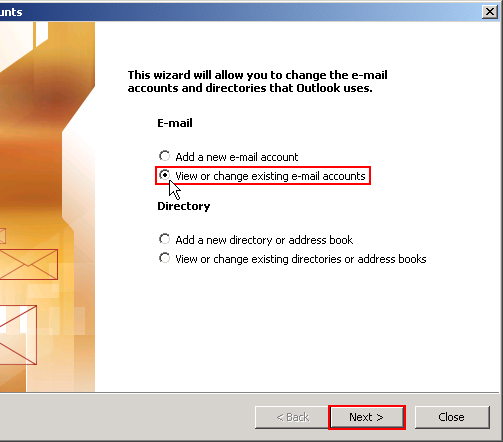
At the E-mail Accounts Wizard window, select the "View or change existing e-mail accounts" option and click Next.
|
 |
|
| 3. |
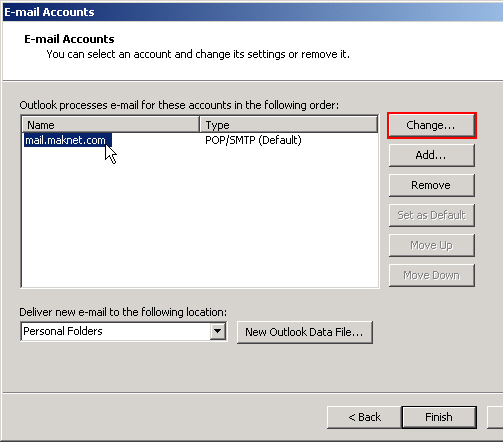
At the E-mail Accounts Settings window, select your email account and click Change. Your email account will typically contain your website or domain name.
|
 |
|
| 4. |
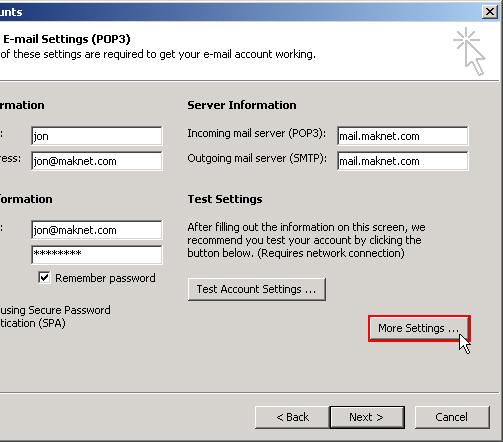
At the Internet E-mail Settings window, click the More Settings button.
|
 |
|
| 5. |
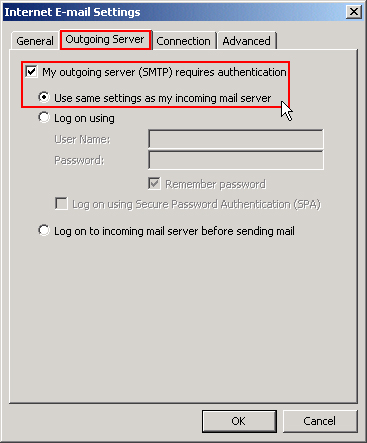
At the More Settings window, click the Outgoing Server tab and ensure the "My outgoing server (SMTP) requires authentication" box is checked and the "Use same settings as my incoming mail server" option is selected.
|
 |
|
| 6. |
Click OK to close the More Settings window. Click Next then Finish to close the E-mail Accounts Wizard. |
 |
|
|
Your configuration should now be updated. If you have any questions or need any further assistance, please don't hesitate to Contact Us. |
|
| Change Spam Settings | top |
There are two things that control Spam Settings:
1. You can completely deactivate Spam Controls by logging into your webmail at http://webmail.yourdomain.com/email with your username and password. At the bottom is a Spam Detection check box. Clear it and no detection will be done for that particular account.
2. If you prefer to keep Spam Filtering but find it too strict, you can configure how sensitive it is:
- Log into your webmail (http://webmail.yourdomain.com).
- On the left menu is a Spam Settings option, Click it and there will be a few options.
- The life-preserver icon to the right of each option will tell you what it does.
- The first two are typically the two that you will change.
| * Tag Level: | This will place the text from the Subject Tag box into the subject if the Score (explained later) is above this number. The HIGHER this is set to the more relaxed the filter is, letting more spam get through but decreasing the chance of a false-positive. (Recommended 3). |
| Reject Level: | This will move the email from your Inbox to the Spam Folder (you can check via webmail in the junk-mail folder). Recommended to be equal to or greater than the * Tag Level. |
| Subject Tag: | See * Tag Level. |
| Rewrite Subject: | Should be checked if you want the * Tag Level options to take effect. |
| Modify messages tagged as spam: | How you want the email to look like if the email is actually tagged as spam. Leaving it as default is usually sufficient. |
| Skip RBL Checks: | Left unchecked, this compares the sender's email server to a list of known spam email servers, and rejects immediately if on this list. |
You may also use the Whitelist / Blacklist to never mark as spam / always mark mail as spam for a particular email address. Enter one address per line.
| Change SMTP Port - Outlook Express | top |
| 1. |
Please note: In the following diagrams, do NOT change / click anything else asides from the areas indicated in RED. In particular, do not change your servers to "mail.maknet.com"; that is only provided as an example! After you launch Outlook Express, click on the Tools menu located at the top of the email program and select Accounts.
|
 |
|
| 2. |
At the Internet Accounts window, select your email account and click Properties. Your email account will typically contain your website or domain name.
|
 |
|
| 3. |
Click the Settings button.
|
 |
|
| 4. |
Change the number following "Outgoing mail (SMTP)" to 25, 26 or 2006 as directed.
|
 |
|
| 5. |
Click OK to close the Outgoing Mail Server window. Click Apply then OK to close the email Properties window. Click Close to close the Internet Accounts window. |
 |
|
|
Your configuration should now be updated. If you have any questions or need any further assistance, please don't hesitate to Contact Us. |
|
| Change SMTP Port - Outlook | top |
| 1. |
Please note: In the following diagrams, do NOT change / click anything else asides from the areas indicated in RED. In particular, do not change your servers to "mail.maknet.com"; that is only provided as an example! After you launch Microsoft Outlook, click on the Tools menu located at the top of the email program and select E-mail Accounts.
|
 |
|
| 2. |
At the E-mail Accounts Wizard window, select the "View or change existing e-mail accounts" option and click Next.
|
 |
|
| 3. |
At the E-mail Accounts Settings window, select your email account and click Change. Your email account will typically contain your website or domain name.
|
 |
|
| 4. |
At the Internet E-mail Settings window, click the More Settings button.
|
 |
|
| 5. |
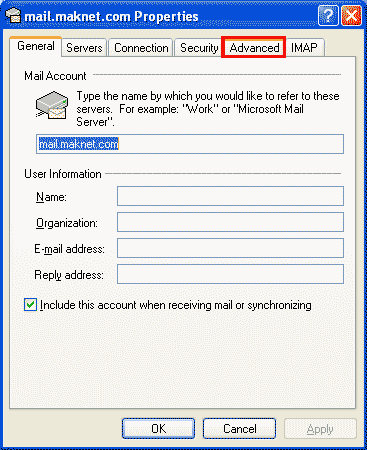
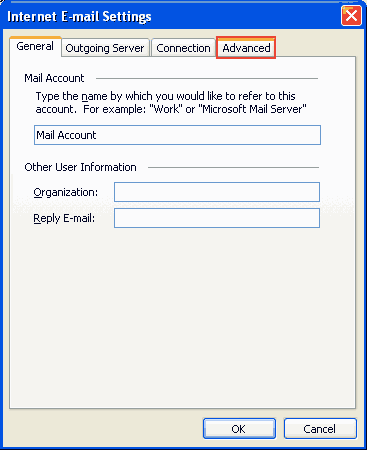
At the More Settings window, click the Advanced tab.
|
 |
|
| 6. |
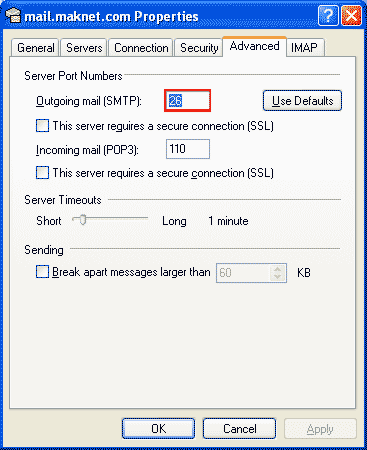
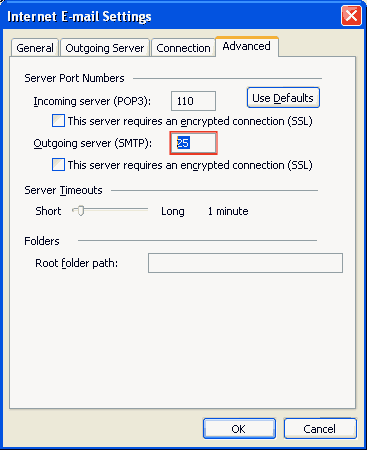
Change the "Outgoing server (SMTP)" to 25, 26 or 2006 as directed.
|
| 7. |
Click OK to close the More Settings window. Click Next then Finish to close the E-mail Accounts Wizard. |
|
Your configuration should now be updated. If you have any questions or need any further assistance, please don't hesitate to Contact Us. |
|


